At the beginning of July, I joined the
Repeat Impressions Rock Star Team and I've been having a blast. Each Monday, the Rock Stars take turns sharing a project of the week on the Repeat Impressions blog:
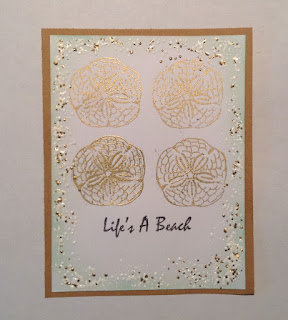
The House That Stamps Built. This week, it just happens to be my turn. I'm a bit nervous as it is my very first one, so please be understanding, okay? I'm going to show you how to use frantage (the chunky embossing powder that you see all over in the card making world right now) with a mini tutorial on using a stamp-a-ma-jig. I just learned how to use frantage the right way and I'm super excited. Here is what the finished card looks like:
Ready? Let's go. Here are the items you will need to create this card:
1 Piece of white card stock 4.25 x 11 inches scored at 5.5 inches on the long side
1 Piece of kraft card stock 4.25 x 5.5 inches (my kraft is too flimsy for a card base, so I will attach it to the white card stock base)
1 Piece of white card stock 4 x 5.25 inches
Aqua Mist ink (Papertrey Ink) and an ink dauber
Versamark ink
Black ink (which I forgot to add in the picture above)
Stamp-a-ma-jig
Stampendous Frantage Embossing Powder (I used Shabby White)
Regular gold embossing powder
Heat Tool
Score tape
Repeat Impressions stamps "
4109 Sand Dollar" and "
2407 Life's a Beach"
I started out by using my ink dauber to ink the edges of my 4 x 5.25 inch piece of white card stock with aqua mist ink. If you look really closely, you can see that I used a pencil to lightly trace my sand dollar stamp onto the panel so I would have an idea where I wanted to stamp the image.
Then I used my Stamp-a-ma-jig to get the proper alignment. I forgot to take a picture of the very first step (arghh), but I do have the first step later on with the sentiment. Line up the acetate piece in the corner of the tool, ink up your stamp and line up your mounted stamp right in that same corner and stamp. You can see how my black image is in the upper left corner. I used black so I would be able to see it against the white card stock.
Place the image on the acetate in the spot you want the image to be on your card. Then nestle the tool right onto the corner of the acetate.
Remove the acetate while keeping the tool in the same position and line your stamp (black ink cleaned off and the stamp re-inked with versamark) up in the corner of the tool and stamp.
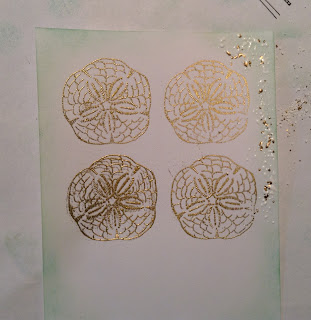
After I had stamped all four of the sand dollars I covered them with gold embossing powder.
And embossed them with my heat tool. All nice and shiny.
Now the fun part! Working on a small section at a time, sprinkle on the frantage powder. I use a small paintbrush to sweep stray pieces. Turn on your heat tool and (this is the KEY!!) heat the powder from UNDER the card stock. If you try to do it from the top like normal embossing powder, it will blow all over the place and not a single piece will stay on the card stock. I know, I've done it. But if you do it from underneath, the powder barely moves.
Here it is nice and melted:
Continue on in this way until you have gone all the way around. This picture shows my panel all embossed except the last section.
Once that is finished, it's time to stamp the sentiment. Here is the promised picture of the first step for using the Stamp-a-ma-jig. The acetate is lined up in the corner of the tool and the mounted stamp has also be lined up and stamped.
Place the sentiment on the acetate in the position you want it on the panel and line up the tool.
Remove the acetate while keeping the tool in place and nestle the stamp in and stamp.
My card stock warped a bit due to the embossing, so I used a lot of score tape to adhere it to the kraft panel.
It needed a little something else, so I add a tiny pearl on either end of the sentiment to draw attention to it.
Here's a close-up of all the frantage goodness:
Thanks so much for stopping by and checking out my Project of the Week. I hope it was helpful.
Challenges:
Sister Act Card Challenge #112--anything goes
V's Sweet Ideas #37--anything goes
{Pin}spirational Challenge #146--inspiration photo (I was inspired by the beach theme)
 MFT #240
--sketch
 Addicted To Stamps #156
--anything goes
Inspiration Destination #45--anything goes
Raisin Boat #36--summertime
Frosted Designs--metal/metallics (I used gold embossing powder)
Brown Sugar Challenge #158--anything goes
Sister Act Card Challenge #118--anything goes
Jo's Scrap Shack #100--anything goes
Creative Fingers Challenge #89--anything goes


