Tuesday, October 31, 2017

Skating Along

Oh, my goodness!!!  It's November already!  Where has this year gone?  Since it is the first of the month, it's time for another challenge from Crafty Hazelnut's Christmas Challenge Extra.  It's Anything Christmas-related goes and you have all month to play along with us.  Our sponsor is the fabulous Bugaboo Stamps.
Here is my card using the adorable "Penguin Winter Skate":
 I just purchased the "Slide On Over" dies from Law Fawn, and they are really the reason I chose to use this image (other than it is soooo adorable!).  I wanted to create the action of the penguin skating along in the frosty air.  As you pull the little tab that says "Slide Me", the penguin skates along with his nice, cozy, warm scarf.
 Isn't that so fun!!??  Love what you can do with these dies.  This is the second time I've used them, and it will NOT be the last.
There are less than two months left until Christmas, so it is time to get started on those Christmas cards, if you haven't done so already.  And if you have, keep up the good work and keep playing along with us.  Thanks for stopping by!

Supplies:
Stamps: Bugaboo Stamps "Little Penguin Winter Skate" digi; Lawn Fawn "Push Here" sentiment
Dies: Lawn Fawn "Slide On Over"; Spellbinders "Classic Circles, large"; Memory Box snowflake and snowflake border die; Neat and Tangled "Falling Circles Cover Plate" (just won this from their new release!)

Challenges:
The Holly and Ivy #18--anything goes
Simon Says Stamp Monday--All creatures great and small
Sketch Saturday #487--sketch
Hiding In My Craft Room #324--any holiday
Crafty Hazelnut's Christmas Challenge #357--anything goes: something with wings
Cardz TV #19--anything goes
Art Impressions #220--The third dimension (the base circle layer is popped up on foam tape, and then the "snow/ice layer" is popped up with my foam tape so it is quite dimensional)
Little Miss Muffet #174--anything goes
Incy Wincy Challenge--dress up (my penguin is dressed up with his scarf and skates)
Crimbo Crackers #143--create a scene
Christmas at Sweet Stampin--anything goes
Crop Stop--anything goes

Monday, October 30, 2017

Non-traditional Christmas

Hi, everyone!  It's my turn to share a Project of the Week on The House That Stamps Built blog and I'm going to show you how to create a bokeh background with stamped images.  It creates such a soft look and it's pretty fun, specially if you don't mind doing a lot of sponging.  Here are the things you will need:
 -several coordinated ink colors: I used SU! Tempting Turquoise, Lovely Lilac and Green Galore dye inks plus MFT Gray Grout for image stamping
-white ink: I used SU! white craft ink
-ink daubers or sponges
-white card stock panel
-stamps: I used:
  Repeat Impressions "Snowflake Solid (lg)", "Snowflake Solid (small)" and "Christmas"

Start out with one of your ink colors; sponging it in several places on your panel.  I chose Tempting Turquoise as it was my darkest color.
 Sponge on your next color, overlapping in some areas.
 Sponge on your next color filling up the rest of the white space.  It looks a little splotchy right now, due to the rough edges of my sponge daubers, but don't worry, it will be fixed!
 I switched to sponge pieces and continued to sponge on the ink colors, darkening them, smoothing the color and blending all the colors together better.
 Once you get your inks blended how you want them, start adding the white.  I used the sponge dauber to create different sized circles.  For the smaller circles, I simply pressed the inked dauber directly down onto the paper, like a stamp.  For the larger circles, I used the dauber in a circular motion to create various sized circles.  Overlap them here and there and make some darker by adding more ink over top of the ink already there.  The edges will soften as the ink dries.  Now, be patient and let your panel dry (I know from experience that it will make the next step easier!)
 I used my light gray ink to stamp the large and small snowflakes onto the panel.  I used my mini MISTI because I knew I would have to stamp each image several times since the ink is so light.  I wanted them to be subtle which is why I chose the light ink, but I also wanted them to be seen.
 After the panel dried completely, I turned it into my finished card.  As you can see, as the inks dried (specially that white craft ink) everything softened and blended together perfectly!  I am loving these non-traditional colors for Christmas!!
I finished it off with a bit of ribbon I've had forever, a vellum die cut snowflake topped with a recycled button, and some nuvo crystal drops.  Thanks for checking out my Project of the Week!

Supplies:
Stamps: Repeat Impressions "Snowflake Solid (lg)", "Snowflake Solid (sm)" and "Christmas"
Dies: Spellbinders "A2 Matting Basics A"; Sweet n Sassy small snowflake

Challenges:
Christmas at Sweet Stampin--anything goes
Through The Purple Haze #136--undtraditional Christmas colors
ABC Christmas--U is for unlimited and V is for vibrant
The Holly and Ivy Christmas Challenge--anything goes
Crafting By Designs--Get ready for Christmas
Fab n Funky #368--Christmas
MFT #356--sketch

Mod Squad--add snow with optional twist of making a bokeh background
Simon Says Stamp Wednesday--anything goes
Cardz TV #19--anything goes

Friday, October 27, 2017

Fairy Princess

Happy Friday!!  It's time for another challenge from Jo's Scrap Shack.  As always, we are now an Anything Goes challenge and our sponsors for this week are Little Blue Button Stamps and Bugaboo Stamps.   The challenge is Anything Goes, but we have a fun optional twist for you: use the colors violet, sky blue and white.


I was given this gorgeous fairy image to work with from Little Blue Button Stamps:
 Ooo . . . isn't she stunning!?  So, I worked really hard to use the optional colors and thought I did a really fabulous job until I was uploading my card and saw that I was supposed to use sky blue.  The whole time I thought it was aqua blue!  So, let's just pretend that this is a really, really, really blue fall sky.  That will work, right?  Well, it's going to have to because I LOVE how this card turned out.  There is so much sparkle and texture.  I used a clear wink of stella pen on her wings for some fabulous sparkle.   The blue layer is some pretty purple/blue/pansy flower vellum that I layered over a bright aqua panel.  Then I used some Silver Chrome Glimmer Kiss Gilding Paste to spread over the panel.  It added some gorgeous sparkle which you can see in the photo below.
I matted the  image on some violet mulberry paper, and added some light blue rhinestones to her crown.  Then I finished it all off with some fabulous sheer ribbon recycled from a gift I received last year. 
  Now it's your turn.  I hope you will play along with us; I'd love to see your creations using this color combo.

What do you need to do to enter?
Challenge Rules

1. Please post a direct link to your blog post that includes your challenge entry project, using the linky tool on Jo's blog. 

2. Be sure to include a link back to Jo's Scrap Shack and to the challenge post you are entering your project into

3. THREE entries per person are allowed for each challenge and you must post a separate blog post for each entry.

4. For all entries -NO BACK LINKS ACCEPTED- 
The date on your blog post should be dated between the start date and the end date for the challenge you are entering, in order to be eligible for the challenge prizes

5. You may link up to other challenges but be sure to link back to Jo's Scrap Shack and to the challenge post you are entering 

 * All entries that do not meet the challenge requirements
WILL NOT be eligible for the top 3, any sponsor wins or any random wins by Jo
All random wins will only be mailed within the US and Canada only.

You have until Nov. 2nd by 6:00PM (eastern, USA) time to link up.
All winners will be announced during the week ofFNov. 5th.
Have fun and we look forward to seeing what you create.

Supplies:
Stamps: Little Blue Button Stamps "Princess Fairy" digi; Kraftin' Kimmie Stamps "Girl Talk" sentiment
Dies: Spellbinders "A2 Matting Basics A" rectangle, trimmed down; MFT "Blueprints 13" banner also trimmed down

Challenges:
Kraftin' Kimmie Stamps Wonderful Wednesday--anything goes
Sweet Sketch Wednesday 2 #124--sketch (turned on it's side)

Crafty Creations #353--anything goes
Simon Says Stamp Wednesday--anything goes
Crafty Gals #146--anything goes
Penny's Challenge #352--anything goes
Shopping Our Stash #326--that's sketchy (use a sketch)
Hiding In My Craft Room #323--lots of layers
Creative Fingers #135--anything goes
Incy Wincy--dress up
Crop Stop--anything goes
Craft Dee Bow-Z--anything goes with handmade bow

Wednesday, October 25, 2017

Merry Christmas

Happy Wednesday!!  It's time for another challenge from The House That Stamps Built.  Since it is the last week of the month, the challenge is Anything Goes.  We know how much everyone loves those.  The color combo of my card is non-traditional, for sure, but it was guided by the ribbon I used.  It was sitting on my desk, discarded after a different project and I really wanted to use it up, so I picked the other colors to go along with it.  And I really love how it turned out; so pretty!
I started by stamping the large snowflake and then added in the smaller ones to fill the spaces.  Then I took the postcard stamp and overstamped it with a light gray ink to add some visual texture.  Finished everything off with the green ribbon and a button that was salvaged from a piece of clothing my kids had outgrown (that's how I get just about all of my buttons).
I hope you will get a chance to play along with us; I love seeing what you come up with.

Supplies:
Stamps: Repeat Impressions "Snowflake Solid (lg)", "Snowflake Solid (sm)", "Christmas" and "Postcard"
Dies: MFT "Blueprints 25" stitched rectangle

Challenges:
CraftDee Bow-Z--anything goes
Christmas At Sweet Stampin'--anything goes
Through The Purple Haze #136--untraditional Christmas colors
ABC Christmas--U for unlimited
Pixie's Crafty Workshop #303--anything goes with snippets
C.R.A.F.T. #438--Christmas
Cute Card Thursday #500--snowflakes
Sketch Saturday #486--sketch

Shopping Our Stash #326--that's sketchy (use a sketch)
Cardz TV #18--anything goes

Saturday, October 21, 2017

Harvest

Welcome!!  It's time for another challenge from Di's Digi Designs.
This time we have a very timely one for you: Halloween or Harvest.  Since I don't celebrate Halloween, I went with the harvest theme.  And I had to really think outside the box with this one as I didn't have any real harvest type images.  But around here (in Southern New England), it is apple harvest time and when I spotted this sweet image with the apple, the wheels started turning!  So, here is my harvest card for your inspiration:
I decided to try a fun spotlighting technique; putting all the focus on the sweet faces of this adorable pair of friends.  I used a stitched circle die to cut out my desired portion.  Then I stuck it back in and adhered it down with the rest of the image.  It's kind of a good idea that I decided to do this because my brown marker I used on the horse is starting to run out.  If I had colored the whole image, I don't think it would have ended up well.  On that note, if anyone has any good places to buy Spectrum Noir refills, please let me know!
I hope you will all get a chance to play along with us this challenge; I can't wait to see what you create!

Supplies:
Stamps: Di's Digi Stamps "An Apple A Day" digi; Craftin' Desert Divas "Truckload of love" sentiments and apple
Dies: MFT "Southwestern Border duo" and "Blueprints 12" stitched circle and banner

Challenges:
Dare 2B Artzy--fall colors
Art Impressions #219--stamp a scene
Hanna and Friends #284--stars
The Paper Shelter #314--make it square
Simon Says Stamp Wednesday--inspiration photo (inspired by the fall theme and colors)

Kraftin' Kimmie Stamps wonderful Wednesday--anything goes AND I used their sketch

As You Like It--do you prefer people or animals (really like using both on my cards, but I LOVE the adorable little animals (like I used on this card), so I guess I would lean more towards them.)
Creative Knockouts #216--Fall
Southern Girls--crazy for critters

Friday, October 20, 2017

Get a Load of this!

The youngest son of our good friends turned 9 this week (he is a month older than my twins who are his good buddies).  I created this fun card for him and I think he is going to love it!
 I mean, what 9-year-old boy wouldn't love a card full of trucks and heavy equipment!?  And this one has an extra fun element: I created my first ever penny slider!!  You can see how the truck gets filled up with a LOAD at the top of the hill and then rolls down to the bottom of the hill.  It's so fun!!

I got some slider dies from Lawn Fawn a couple weeks ago, and of course, I had to put them to use!  And this will definitely NOT be the last one I make.  It was so fun!

Supplies:
Stamps: YNS "Keep on Truckin'"
Dies: Lawn Fawn "Slide On Over" and "Stitched hillsides"; MFT "Blueprints 13" stitched rectangle

Challenges:
Cardz TV #18--anything goes
Creative Fingers #139--anything goes
Crafty Catz #289--anything goes with optional twist: autumn colors (I did use orange, yellow and brown)
Little Miss Muffet #174--anything goes
Kraftin' Kimmie Stamps Wonderful Wednesday--anything goes
Penny's Challenge #350--anything goes
YNS #75--I used the colors orange, golden yellow and gray (on the vehicles) and neutral brown)

Crafty Creations #352--anything goes
Love To Craft Challenge Blog--anything goes
Scrappers Delights--anything goes

Wednesday, October 18, 2017

Give Thanks

Happy Wednesday!!  It's time for another challenge from The House That Stamps Built.  This week we have a sweet inspiration photo for you:
Image may contain: text
You can be inspired by the actual photo or the color scheme or both!
I was inspired by the colors, specifically the 3 on the bottom: kraft/tan, rust/orange, dark brown and then the olive green.  And here is what I came up with:
It's Fall and I am in full pumpkin mode!!  This "prize pumpkin" image from Repeat Impressions is my favorite pumpkin stamp; it's just perfect!  I hope you will play along with us this week; I love seeing what you come up with.  And if you "need" any of the stamps I used today, check out my 10% off your entire order code over in my left sidebar.

Supplies:
Stamps: Repeat Impressions "Prize Pumpkin", "Let us . . ." and "Acorn"
Dies: PTI "Tag Sale #4"and "Rustic Wreath"

Challenges:
Craft-Dee BowZ--anything goes with handmade bow
Cards Galore--anything goes
Pattie's Creations #139--shades of autumn
Divas That Cut--inspiration photo (inspired by those pumpkins and colors in the photo on the left)

Dare 2B Artzy--fall colors
Crafting by Designs--anything goes
Sugar Pea Designs #36--sketch

If You Give a Crafter a Cookie #79--inspiration photo (inspired by the pumpkins)

Brown Sugar #271--orange, brown and green
Creative Inspirations #282--autumn/halloween
Cute Card Thursday #499--circles
Time Out Challenge #94--inspiration photo (inspired by the orange pumpkins)
YNS #75--inspiration photo (inspired by the pumpkins and the color combo)

Alphabet Challenge--P is for Pumpkin
Gem of a Challenge #205--spots or stripes or Halloween
Sweet Stampers--autumn or Halloween
Make It Monday #300--Build a wreath

Saturday, October 14, 2017

Cozy Fire

Phew . . .it's the middle of October already!!  That means it's time for our mid-month inspiration for Crafty Hazelnut's Christmas Challenge Extra.  It's always anything Christmas-related goes.  You have all month long to play along with us.  Here is my inspiration for you:
 I have had this card base for at least 12 to 15 years.  Someone was cleaning out their stash and gave me a whole bunch.  The window was already cut and I've been looking at it for several months now thinking it would make a really fun card, but not knowing what to do with it.  And today, for some reason, an idea popped into my head and I went with it.  I started by using some rust colored ink and a brick wall stencil to create the outside of the "house".  Then I stamped the wreath image 4 different times so I could fussy cut the different layers of the bow to give it dimension.  You can't see it in the photo, but there are 4 layers to the bow, counting the center knot.  Glued them all in place and fussy cut the wreath out so I could "hang" it from the window.  Then, I had fun stamping the little scene inside the house.  Each element is separate, but it was much easier using my new mini MISTI.  I totally forgot about this set, but I might need to pull it out and use it again, the scenes you can create with it are so fun!  I used a sheet of acetate behind the cut out to create a window and placed a piece of patterned paper behind the upper half of the "window" to create the look of a window shade.
I hope you will play along with us.  Christmas is coming, and fast!  And it's never to early to get started on those Christmas cards.
Supplies:
Stamps: Repeat Impressions: "Wreath"; Clear Dollar Stamps "Home is Where the Hearth is" all scene elements and sentiment

Challenges:
ABC Christmas--U is for unlimited
Crafty Creations #352--anything goes
Art Impressions #219--stamp a scene
Hanna and Friends #284--stars (I used star brads on my sentiment strip)


Friday, October 13, 2017

Christmas letters

Happy Friday!!  It's time for another challenge from Jo's Scrap Shack.  

As always, we are now an Anything Goes Challenge.  Our awesome sponsors for this week are Starz Stamps
 and Limited Runs Digital Stamps
I was given this adorable image from Starz Stamps to use, and here's my card:
 I added wink of stella clear to the "fur" on her clothes and the snow on the ground.  I have trouble using my pen (user error, I'm sure) and a blob dropped on my desk.  So, I dipped my pen in it and used it to color the snowflake.  It doesn't show well in the photo above, but you should be able to see it better below.


What do you need to do to enter?
Challenge Rules

1. Please post a direct link to your blog post that includes your challenge entry project, using the linky tool on Jo's blog. 

2. Be sure to include a link back to Jo's Scrap Shack and to the challenge post you are entering your project into

3. THREE entries per person are allowed for each challenge and you must post a separate blog post for each entry.

4. For all entries -NO BACK LINKS ACCEPTED- 
The date on your blog post should be dated between the start date & the end date for the challenge you are entering, in order to be eligible for the challenge prizes.

5. You may link up to other challenges but be sure to link back to Jo's Scrap Shack and to the challenge post you are entering 

 * All entries that do not meet the challenge requirements
WILL NOT be eligible for the top 3, any sponsor wins or any random wins by Jo
All random wins will only be mailed within the US and Canada only.

You have until Oct 19th by 6:00PM (eastern, USA) time to link up.
All winners will be announced during the week of Oct 23rd.
Have fun and we look forward to seeing what you create.

Supplies:
Stamps: Starz Stamps "Santa's Letter" digi; Verve "Peace on Earth" sentiment
Dies: Spellbinders "Standard Ovals, large" and "Classic Scalloped Ovals, large"; Marianne Designs snowflake

Challenges:
Sparkles Challenge #31--Christmas is for kids
Scrapper's Delights--anything goes
Creative Sketchy Girls #16--sketch (I turned it on it's side)
Crop Stop Challenge--anything goes
The Holly and Ivy #16--anything goes
Southern Girls--stripey days are here again
Penny's Challenge #350--anything goes
ABC Christmas --U is for unlimited (anything goes)
Addicted To Stamps #263--anything goes


Wednesday, October 11, 2017

Patterned Pumpkin

Welcome to another challenge from The House That Stamps Built.  This week we have a tic-tac-toe board for you to play along with:
No automatic alt text available.
And here is my card for your inspiration:
I used the first column: Pumpkins, patterned paper and metallics.  I also used eyelets and black and white (mostly).  My card for last week's "Count Your Blessings" challenge used paper pieced pumpkins, but I just couldn't resist doing the same again this week.  I just think pumpkins are so fun with a little pattern on them.  I made this for my sister-in-law's birthday which is this week.  She is very classy and elegant, but simple and uses a lot of black and white both in her clothing in decor.  So, I went with this classy black and gray color scheme with just a pop of color from the pumpkin.  I pulled in my metallics with copper thread and eyelets.  I think this will be perfect for her.
I hope you will play along with us this week; the tic tac toe challenge allows you to create your own challenge for the most part.  So, there's no excuse!!

Supplies:
Stamps: Repeat Impressions "Round Pumpkin" and "Happy Birthday"
Dies: Impression Obsession "Stitched Pumpkin leaves"; Spellbinders "Labels 27"

Challenges:
A Gem of a Challenge #204--birthday card
Crafty Hazelnut's Patterned Paper--anything goes with patterned paper
Dies R Us #382--life's events
Cuttlebug Mania--hello sweet pumpkin
As You Like It--choose ribbon or flowers (I love using ribbon as even a little bit can dress up your project without being overly froofy!!  This piece was a nice little scrap.)
Cute Card Thursday #498--anything goes
If You Give a Crafter a Cookie #79--inspiration photo (I was inspired by the pumpkins and the black of the spiders)

Aud Sentiments #190--use a die cut
Viva La Verve October--sketch

Cardz TV #16--anything goes
Hiding in My Craft Room #321--Halloween colors
Crazy 4 Challenges #406--make a card
Kraftin' Kimmie Stamps #402--fall colors
{Pin}spirational Challenge #201--inspiration photo (inspired by the colors)


Tuesday, October 10, 2017

Birthday Invitaion

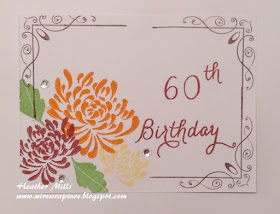
Last weekend, we had a surprise 60th birthday party for my mother-in law.  It was a small party with a few family friends and my father-in-law wanted me to create a small invitation that he could hand out inconspicuously at church.  So, I created these one layer 3x5 sized cards (this is the front and the invitation info is on the back side--no folds at all).
 Here is the info on the back:
Supplies:
Stamps: PTI "Mum's The Word" mums and leaves; Sweet n' Sassy Stamps "Anniversary Milestones"; Flonzcraft flourish, and the invite info is from a random wood stamp I've had for ages!

Challenges:
CAS-ology #270--ODD (I used 3 flowers, 3 corner brackets and 3 rhinestones
Kraftin' Kimmie Stamps #402--fall colors
Less Is More #349--hot and spicy colors
Stamplorations CAS--orange

Crafty Catz #87--CAS
Inspiration Destination--anything goes
Crafting By Designs--anything goes
Incy Wincy--Let's celebrate
Power Poppy--mini & mighty (create something smaller than an A2 card)
Dare 2B Artzy--fall colors
Paper Nest Dolls--anything goes


Saturday, October 7, 2017

Cowgirl Mom

I'll start off with a disclaimer: this post contains a LOT of pictures!!  But it is a gift for my mother-in-law's birthday and a special gift and card deserve a lot of pictures.  Here it the entire set I created:
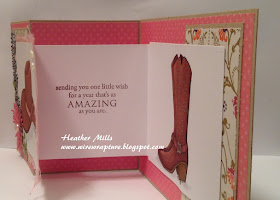
 The card is 5x7 to fit the size of the images I printed out.  I wanted to use both the hat and boots and have seen a lot of fun folds around lately, so I decided to make a z-fold card.  Since the card is so large and the image panels are large, I had to figure out dimensions and layout bit by bit.  I had to piece together the card base as it actually ends up being 5x14 and my card stock doesn't come that large.
 Here is the view of it starting to open:
 And here are the fabulous boots on the inside:
 The sentiment is stamped on the center part of the interior z-fold element:
 Here is a close up of the hat:
 And the boots!!  Oooo . . . I just love them!!  The image actually comes as one boot, so I printed two out the exact same size, colored them, fussy cut one out and adhered it on top of the other to look like a matched pair.    I just love how it turned out!!
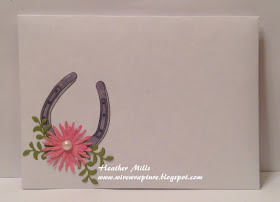
 Due to the large size of the card, I used my envelope punch board to create an envelope for it.  I totally forgot to  to take a picture of the inside of the envelope.  I used a sheet of patterned paper that looks like a hale bale which I thought was perfect to go along with the cowgirl theme.  I decorated the envelope with the horseshoe image and added a flower to coordinate with the card.
 I created this adorable little treat holder to hold s special little gift I made for her.  I used the same kraft card stock as the card and added some pink ribbon to tie it into the card color scheme.  I stamped the box with a small leaf sprig stamp to add some interest and finished it off with a sweet little tag.
 And last, but not least, here are the earrings I made for her:
They are hammered sterling silver with sodalite ovals.  They are a gorgeous denim blue with tan inclusions, unfortunately the light in the photo gives them a much darker appearance.
Thanks for stopping by!

Supplies:
Stamps: Digi Stamps4 Joy hat, boots, and horseshoe digi images; PTI "Big Birthday Wishes" sentiment and "Turning a New Leaf" leaves on box and tag and "Mat Stack 3" sentiment on tag
Dies: PTI daisy die; Verve "Sprightly Sprigs" leaf sprigs; Spellbinders "A2 Matting Basics A" rectangles;  Elizabeth Craft Designs treat box

Challenges:
Card:
Simon Says Stamp--make a card for World Card Making day
Crazy 4 Challenges--make a card (for world card making day)
Cardz TV #16--anything goes
Cute Card Thursday #298--anything goes
Little Miss Muffet #173--anything goes
Penny's #349--anything goes
Fab n' Funky #365--pretty in pink
Crafting By Designs--anything goes
Incy Wincy Designs--Let's Celebrate
Sheep Ski Designs #7--use some pink
Dies R' Us #83--Life's events
Cards Galore--anything goes
Unicorn Challenge #26--perfectly pink
In the Pink--flower power

Box:
As You Like It--choose ribbon or flowers (though I did use a flower on my card, I would have to say I prefer ribbon.  I used two little snippets on my box and it is just the perfect way to finish off something like that.  Plus it can be used on just about any style card--even masculine--without being too feminine)
Creative Knockouts #121--anything goes
Crafty Creations #53--anything goes
Crafter's Cafe--use die cuts and/or punches
Score-pal #42--treat holders (mine is a little treat holder, it just happens to hold some bling treats!)


Earrings:
Love to Craft Challenge--anything crafty goes